Emily Biondo’s Pick Up the Phone

This interactive piece is one that involves the discomfort of a communication breakdown. While listeners interact with the piece, they are able to palpably feel awkward through both the audio and the sensory experience of the angled fans.

In this work, a blinking light draws one to pick up the phone. One hears a conversation that is regrettably all too familiar to many a relationship—there is passive aggression, a certain one-sidedness, and an unwillingness to share both information and emotions. While engaging in the audio, a sensory element in the form of a high-powered fan turns on to distract the listener and further complicate the uncomfortable situation. In the end, the listener must choose to continue listening or to avoid the awkwardness of the audio and fan by hanging up the phone.

Arduinos played a large role in the piece. One Arduino controlled the functioning of the audio using a Waveshield. This device reads .wav files off a memory card and transmits them through a speaker. I wired the Waveshield to the actual phone speaker, separated only by the hook switch that hangs up the phone.

Also attached to the hook switch is another Arduino that controls the functioning of the two wall-mounted fans and the blinking led embedded in the side of the phone. The only other piece required is a 220 Ohm resistor to support the led.

The code worked as follows: if the hook switch is depressed (the phone is hung up), the led blinks in a continuous loop. However, if the hook switch changes position (the phone is picked up), the led remains on without blinking and an audio file begins to play once, reset by the hook switch to the beginning of the audio. After an 8 second delay, the two wall-mounted fans turn on and remain on until the phone is hung up. At this juncture, the fans turn off and remain so until the phone is picked up again.

Posted by Emily

Adam’s new ideas

I have a  few new ideas that I will be building in the near future.  One of them is a variation on an infinity box.  I know these have begun to be overdone in the recent past, but it’s a project that I’ve needed to do for a while just to satisfy myself.  This version I have in mind is made of one way mirror and plexi.  It will be 8’h x 4’w x 4’d, and will open from one side.  Each wall will be one-way mirror, and the ceiling and floor will only have to be regular mirror.  It’s designed in such a way that a person enters from the hinged side and can closed the door.  In order for the one-way mirrors to be effective, I’ll need a light source inside the box.  In this way, viewers can see through the box from outside, but the person inside sees only his/her reflection repeated infinitely on all sides as well as from above and below.  I believe it will create quite a disorienting effect and leave a lasting impression on the participants, but for it to work, I need to place the lighting along all of the inside corners in such a way that the box is outlined on the inside.  The lighting has to be inside because of the way one-way mirrors work (the lighted side is reflective and the darker side is see-through).  This project won’t require a microcontroller unless I decide to time the lighting or something in that fashion.  The door itself will act as the switch to turn the lights on.

My second future idea will be a sound piece.  I haven’t yet researched everything I’m going to need in order to accomplish this one, but it will entail building an installation out of piano wire or the strings from any stringed instrument such as a harp, cello, or guitar.  I will stretch hundreds of these strings throughout a space where they can be touched, plucked, strummed, etc., and they will be wired to the microcontroller in a way that it will play chords or single notes in  a melodic fashion based on the interaction of the viewer. 

One last idea I have at the moment is a simple one, but it will involve hundreds of computer fans and pinwheels.  The fans will operate the pinwheels either in a predetermined pattern or will be connected to motion or pizo sensors to create the desired effect.  In my mind, this piece could work on the wall or out in a space that people could walk through.  As with most of my ideas, most of those kinds of decisions have to be made throughout the process of making the piece. 

Overall, this has been an excellent class to help me create many new possibilities within my everyday studio practice and has opened countless paths for my work to take.

Adam Hager

Modern use of Morse Code

A project that I hope to complete once more time can be devoted to coding is to work with types of instant messaging systems through time, and how they can collaborate with eachother. I want to work with morse code and translate the messenge into a Twitter and from there, possibly into a slightly randomized video loop.

The project would start with an old-fashioned morse code operation keyer hooked up to an arduino. The arduino’s code would then enable it to translate the traditional morse code into a typed language. This might included updates to the original morse code alphabet to include common Twitter letters such as “#” and “@”. The Arduino would then upload the message  as an @ to the specific Twitter account that would be set up for the project. Any messages sent to this account via an @ sign would then be read by either the same, or another programming system in or outside of the Arduino. Also, when a hashtagged message, for example, #cat would initiate another process.

The computerized component of this project would be in coversation with a small dark room with seating. In the room is a projector that is in direct relationship with the Twitter account. Each hashtagged word, #cat, would trigger a new program to run which searches Youtube for the top video related to the keyword “cat” which would then play visually within the room on the projector. Overall, the project is connecting the dot and line language of Morse Code through modern social media outlets to translate it in to a controlled, but also random, visual language.

Katie H.

TV

In the future I would like to make a sculpture that is more interactive or responsive with the viewer.

I would like to make a system to control a series of images from a VHS, using a television. As the viewer walks past the television, I would like to include a motion sensor to activate the project. Using an H bridge drive and motor, I would like to control the direction of the images being displayed.

The code that I would create would allow the piece to function at a constant speed but at increasing time intervals. The images would run for two minutes forward at the speed of 200, then two minutes backwards at the speed of 200, then increase to 3 minutes forward at the speed of 200, then 3 minutes forward at 200,…ect. i would like to continue this pattern until it reaches to 20 minutes.

I would possibly like to create three or four other televisions with the same code patterns but different images operating at the same time. the televisions would be displayed in a linear formation.

By Michelle Lee

Hit-On Chair

When we were first to come up with ideas for “simple” input/output projects, I felt like I couldn’t think of anything simple enough. (Now I’ve learned that even the simplest idea was more complex than I expected.) However, one project idea I came up with that I still think would be really fun to pursue was a kind of interactive chair. (I really like making chairs, apparently.) The idea goes something like this: A person sits in a chair, and then whenever another body walks in front of the chair, the chair makes a noise. The noises I’ve come with are a whistle (like a wert whirl), a fart, and a laughing sound. These are all noises that make the person walking by feel a little uncomfortable (are they laughing at me?) and/or stare at the person sitting in the chair (this person may also feel a little uncomfortable – yea, blame it on the chair). A motion sensor would be required to sense whenever a person walks in front of the chair. The motion sensor would be on a normally open circuit, and some kind of button would have to be built into the chair to close the circuit when a person is sitting on the chair, that way the chair won’t make noise when it is unoccupied. (Although, now that I think about it, a vacant chair making these noises could also be interesting… Hmm.)

This piece doesn’t directly relate to my project idea, but it’s pretty damn cool and is also an interactive chair:

Posted by Melissa

Future Project Ideas

After completing my the first arduino project and being exposed to all of the possibilities that this micro controller has to offer, it’s hard not to obsess with potential new ideas.

This summer, I would like to research and begin developing two new projects that  are more relevant to my non-electronic studio work.

My first idea involves studying the intricate communication modes of fireflies. Since there are hundreds of species, each with their own luminescence frequencies and light-flickering patterns, ardunio’s ability to time (to the millisecond) and fade LEDs very minutely seems to be a project as simple as finding the right LEDs and writing the code.

Another project that I would like to further develop involves using live plants as an interface for technology. Using plants of the species Mimosa pudica (sensitive plants) that cower away when touched, I want to further anthropomorphize these organisms by giving them the power to verbally interact with humans. I would like to attach some of the same ultra-thin copper wire that I used in the ‘Dippy-Bird’ project to embed in each plant a mechanical sensor. When the plant is disturbed, it would not only more, but also talk back to the person who harassed it. There would no-doubt be a lot of difficulty with wiring the living plants inconspicuously and non-invasively, but I think that using the movement of these plants as a ‘button’ would be playful and unexpected. See video demo of the plant action below:

Posted by Tyler

Future plans of projects

Having just graduated leaves me with ample time for art-making, and most of my plans involve electronics. My first is an answer to a previous artwork I had completed, but to less success than it should have been. I completed a drawing that visually obscured a personal letter I had never sent. Beyond hiding this text, I also wanted it to somewhat highlight it–upon walking closer, I wanted the viewer to be able to see certain phrases from this letter so as to know that the base of the drawing was in fact sentences.

The Letter, 2011. Pen on paper, 1 x 10 ft.

This didn’t completely happen, so I was stuck with a concept that had never been fully realized. Thus, this new project is a solution to this issue.

I am going to construct a metal cylinder (it could be fully fabricated or a found object) and place the letter within it. There will be a slit in the cylinder so as to reveal only one line of the letter at a time. Using a motor and an Arduino, I will set up a timed course for the letter so that one line displays every 2 minutes. My hope is that the letter’s contents are enough to both draw the viewer and to leave them disappointed that they cannot see the entirety of the letter.

Posted by Emily

My Future Plans

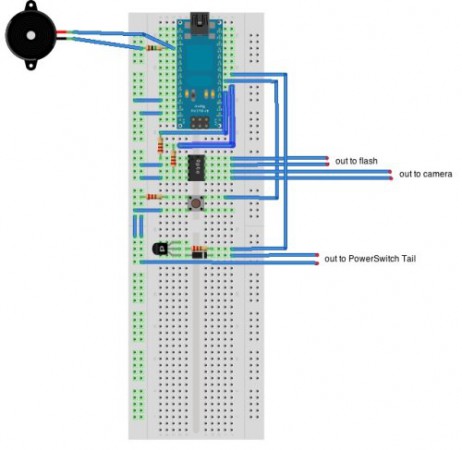
I already posted the video on how to do high speed photography using the arduino. However I found this picture here which shows how you specifically hook this up since the video is a bit confusing. This system uses a sound sensor to trigger the flash to go off and take the picture.

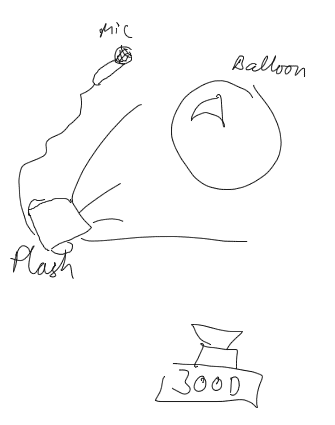
However, I have more recently found another high-speed system with the arduino. Though this one seems a bit unstable it was interesting to look at. It uses a microphone instead of a sound sensor to trigger the flash. You can see it here . This is explained in a better version on this site. It includes an extremely useful diagram seen here. This also lead me to the most amazing website of all time DIYPhotography.net! I’m currently obsessed. 

Both of these systems use sound as the trigger. However I kinda wanted to use a touch sensor so I could drop something and have the picture taken at the exact moment of contact. So I found this video which I am 100% going to try. It is so simple, doesn’t even use an arduino. However I think it would still be use ful to hook this system up to the arduino so that I could control the room’s lighting and the shutter of the camera.

I’m really excited to try out this touch sensor as well as the sound sensors for photography asap. Now that I’m graduating I will have much more time…I hope. I’ve been doing a lot of research on it so the next step is to try it out.

Posted by Katie Neff

Motion Cacophany

For my final piece, I want to work with a simple system that appears complex. Ideally, there would be a row of the same objects, either constructed or bought, that would move in a timed up and down motion. Then I would create more rows, in varying spacing of the objects and have the same motion and timing be programmed for them too, but with a different delay for each. As the motor for each row is set off, it would simultaneously play one line of audio or instrument. Each row with it’s various delays would play a different instrument or audio and this could result in either a cacophony or music pending the viewer’s preference. The beauty is that the whole of the audio is “spontaneous” in its final execution and the movement may seem like different motions in the composition, it’s really the same just delayed in timing. I would have to look into whether it could work off one arduino or if it would need several pending the magnitude of the sculpture.

Posted by Amanda

Paper Sculpture

Through this assignment, I was interested in manipulating an all ready existing object through the use of technology. Before I settled on a concrete function I wished to perform, I created a sculpture I felt would be interesting to experiment with. Using a long sheet on rice paper, I embedded a thin piece of wire along the edge of both sides of the paper. I then manipulated the sculpture into an elongated curvy shape. It was after I made  the sculpture I realized I wanted it to be presented on the ground, and move in a contracting and expanding motion. 

Using a motor that rotates in a circular motion, two linear structures were placed on top of the rotating cap. The elongated pieces of wood reacted by moving back and forth just as the circular cap rotated on top of the motor. Two fulcrums were used to prop each linear structure up as well as limit the amount of space it had to move back and forth. The placement of each fulcrum influenced the amount of movement that was able to be achieved. As the fulcrum moved further back from the motor, the linear structure became more constricted; therefore less movement was achieved. 

Through an H Bridge drive, I was able to create movement that allowed the motor to rotate clockwise as well as counter clock wise. The H Bridge drive acted as two transistors that allowed the motor to  move in one direction then reverse and move in the other direction. The versatile movement created through the H Bridge drive resulted in a more fluid sculpture that created the illusion of a contracting and expanding piece. The code that I programmed into the arduino acted so that the speed of the rotation along with its duration it remained at a certain speed, peaked at the middle of its cycle then slowly decreased back into its original state.

by Michelle Lee